Speed Run Guide
This guide is intended for those on their second, third... playthrough.
This is the bare minimum guide to get the "Speedster" achievement for beating the game in under 15 hours.
Optional things in the guide
- Chests
I left a few in the guide that are quick to get and useful. But feel free to skip them.
- Secret missions
I left them in the boss commentary. But obviously you don't have to get these.
- One sidequest.
Explained in the "Helpful Hints" section below.
Helpful Hints
- Hold X and A during scenes to go though them faster.
- Holy bottles are your best friend. Use a lot!
(Repeed has a skill "Holy Breath" that extends the duration of holy bottles. It is on his Sonic Cleaver +1α)
- 10x experience is very helpful on this playthrough
- If you do the 10x EXP, after getting the "Speedster" achievement, grind to lvl 200 in the Labyrinth of
Memories for the "No More Grinding" achievement (you have to do one sidequest to open the Labyrinth.
It will be in the guide.)
- If you don't think you can make it, changing the battle difficulty to easy will help. Especially with the bosses.
- If you are confused with any directions, you can close your game and go to the full guide. That has more
descriptive directions.
And so it begins...
.----------.
.----------------------------( 00 )-------------------------------.
| `----------´ |
| |
| The Grade Shop |
| |
`-------------------------------------------------------------------------´
These are HIGHLY recommended for this guide.
________________________________
| Name | cost | |=============================| | Items | 500 | <-- I will not be telling where chests with armor or|-----------------------------| weapons are and buying them takes up time.| 10x EXP | 3,000 | This is a MUST HAVE! | OR | | | Double EXP | 1,000 |
¯¯¯¯¯¯¯¯¯¯¯¯¯¯¯¯¯¯¯¯¯¯¯¯¯¯¯¯¯¯¯¯** NOTE: EXP multipliers don't stack
If you have extra grade, these are recommended options:
________________________________
| Name | cost | |=============================| | Max 99 Items | 400 ||-----------------------------|| 2x Gald | 600 | | OR | | | Gald | 1,000 |
|-----------------------------|| Skills | 1,000 |
|-----------------------------|
| Artes | 1,000 ||-----------------------------|| Skill SP 1 | 3,000 |¯¯¯¯¯¯¯¯¯¯¯¯¯¯¯¯¯¯¯¯¯¯¯¯¯¯¯¯¯¯¯¯If you feel you do not have enough grade, you can always go back into your first playthrough and grind for more.A great way to do this is..."For Rita: Minimum Damage, Light Magic, OL Boost, OVL Bonus 2, Spell End skills. Wonder Symbol (or Shizel's Necklace) should be equipped. For Everyone else: Taunt 2 and set them to defend. And as many Blue Dice as you have equipped.I guess having Limit Bottles wouldn't hurt. Ok, now overlimit BLAH BLAH BLAH, TIDAL WAVE! BLAH BLAH BLAH, TIDAL WAVE! ...ad infinitum.The FS Chains are what boost the grade up to this." - Drache
.----------. .----------------------------( 01 )-------------------------------. | `----------´ | | || The Imperial Capital, Zaphias || | `-------------------------------------------------------------------------´
After the scene, go forward up the stairs. Scene. Head to the upper quarter.
In upper quarter, after scene, take the first left. Scene.
Check second window on the left side of the house.
Upstairs, enter door on the left. Scene.
Leave house, battle tutorial. Mash Y to get through it faster?
========
Castle
========
Leave the cell, go left. Check chest in the background for equipment. Leave.
Battle in next room.
OPTIONAL - Left side of bottom floor is a Holy Bottle in the boxes.
Upstairs to the left and head out. Scene, battle, exit at the top.
North until scene. Leave through north exit. Save point.
Take the first left exit. Go south until scene.
Boss fight through the door.
+===========================================================================+
 |                              -- BOSS BATTLE --                            |
 +===========================================================================+
 | Enemy |  HP   | TP  | P.ATK | P.DEF | M.ATK | M.DEF | AGL | Weak | Resist |
 |---------------------------------------------------------------------------|
 | Zagi  | 4500  | 420 |   92  |  104  |   77  |   88  |  69 | Fire | Water  |
 |¯¯¯¯¯¯¯¯¯¯¯¯¯¯¯¯¯¯¯¯¯¯¯¯¯¯¯¯¯¯¯¯¯¯¯¯¯¯¯¯¯¯¯¯¯¯¯¯¯¯¯¯¯¯¯¯¯¯¯¯¯¯¯¯¯¯¯¯¯¯¯¯¯¯¯|
 |  Recommended Level: 5-7                                                   |
 |                                                                           |
 |  Strategy: Make sure you block his attacks often. After he attacks there  |
 |  will be a few second delay and that is when you make your move. Combo    |
 |  attacking followed by Azure Edge. After your combo be ready to block. At |
 |  About the halfway point, Estelle comes in. Continue the block, attack,   |
 |  block pattern while she heals you.                                       |
 |¯¯¯¯¯¯¯¯¯¯¯¯¯¯¯¯¯¯¯¯¯¯¯¯¯¯¯¯¯¯¯¯¯¯¯¯¯¯¯¯¯¯¯¯¯¯¯¯¯¯¯¯¯¯¯¯¯¯¯¯¯¯¯¯¯¯¯¯¯¯¯¯¯¯¯|
 |  Drops: Leather Boots                                                     |
 |  Secret Mission: "Defeat Zagi while protecting Estellise from Zagi's      |
 |  attacks."                                                                |
 +===========================================================================+
Run south, go left, scene. Go through the left door.
After scene, go through the right door.
Press switch. Go back out. Head north, take left exit.
Take first right, press switch, go back.
Head south through the door. Move the statue.
========
Sewers
========
Exit ladder is in the bottom left, leave. Scene.
Head south. Keep going right.
Save point. Go south. Head to the lower quarter.
Scene. Go to bottom right side of the screen to exit.
On the map, Run straight forward on the path to Deidon Hold.
.----------. .----------------------------( 02 )-------------------------------. | `----------´ | | || Deidon Hold || | `-------------------------------------------------------------------------´
Playthrough Time: 25 Minutes
Tutorial Scene. Save point. Try to Head out the north exit. Scene.
Go to lower left section of town. Scene. Exit Deidon Hold to the south.
On the world map, go west up onto the plateau. At the end, enter the forest between the mountain gaps.
.----------. .----------------------------( 03 )-------------------------------. | `----------´ | | || Quoi Woods || | `-------------------------------------------------------------------------´
Playthrough Time: 30 minutes
Follow the path around. North at the first fork, right at next fork.
Scene (cooking tutorial). Save point. Follow the path until you meet Karol. Scene.
Chest has a Life Bottle. Leave.
Halure is up and right a little (huge tree sticking out of it).
.----------. .----------------------------( 04 )-------------------------------. | `----------´ | | || The City of Blossoms, Halure || | `-------------------------------------------------------------------------´
Playthrough Time: 35 minutes
Scene. Go forward to Estelle, scene.
Run up the path again, scene. Go up to the big tree, scene.
Back down, across the bridge and talk to the item shop guy.
Talk to Karol. Leave town.
Go back to the woods you just came from.
============
Quoi Woods
============
Follow the path to the save point. Scene.
Go to the left then south.
  +=========================================================================+
  |                            -- BOSS BATTLE --                            |
  +=========================================================================+
  | Enemy   |   HP   |  TP  | P. ATK | P. DEF | M. ATK | M. DEF| AGL| W | R |
  |-------------------------------------------------------------------------|
  | Eggbear |  12800 |  55  |  205   |  174   |   45   |   32  | 76 | - | - |
  |¯¯¯¯¯¯¯¯¯¯¯¯¯¯¯¯¯¯¯¯¯¯¯¯¯¯¯¯¯¯¯¯¯¯¯¯¯¯¯¯¯¯¯¯¯¯¯¯¯¯¯¯¯¯¯¯¯¯¯¯¯¯¯¯¯¯¯¯¯¯¯¯¯|
  | Recommended Level: 8-9                                                  |
  |                                                                         |
  | STRATEGY: This guy isn't too hard. Get rid of the little guys in the    |
  | beginning then have everyone attack while Estelle heals. Try using free |
  | run to get to his back and hack away. You do want to watch out for his  |
  | multi-swing attack. This can do some serious damage. Other than that    |
  | you should be fine.                                                     |
  |¯¯¯¯¯¯¯¯¯¯¯¯¯¯¯¯¯¯¯¯¯¯¯¯¯¯¯¯¯¯¯¯¯¯¯¯¯¯¯¯¯¯¯¯¯¯¯¯¯¯¯¯¯¯¯¯¯¯¯¯¯¯¯¯¯¯¯¯¯¯¯¯¯|
  | Drops: Bearskin, Eggbear Claw, Egg                                      |
  +=========================================================================+
Scene, back to Halure.
========
Halure
========
Talk to the old man in front of the house to the right.
Scene, go talk to the item shop owner.
Synthesis tutorial. Go to the tree. Scene.
OPTIONAL - Go up to the tree for a Life Bottle, chests to the right contain Holy Bottle and Nectar Bottle.
Back down the ramp. Scene. To the Mayor's house. Scene.
Leave town.
===========
World Map
===========
East to the mountain with all the caves on it, Aspio's entrance.
.----------. .----------------------------( 05 )-------------------------------. | `----------´ | | || The Sealed City of Scholars, Aspio || | `-------------------------------------------------------------------------´
Playthrough Time: 53 minutes
Forward to the gate. Scene. Take left path to library. Scene.
Save point. Up the stairs and exit.
From the center of town take a right to Rita's hut. Scene.
Check book pile by the door. Scene. Exit Aspio.
===========
World Map
===========
Head to the east for the ruins.
.----------. .----------------------------( 06 )-------------------------------. | `----------´ | | || Shaikos Ruins || | `-------------------------------------------------------------------------´
Playthrough Time: 58 minutes
Scene. Go forward.
OPTIONAL - First left, chest containing a Life Bottle.
Continue forward, scene. Enter the hole, scene.
Go south, down left stairs. continue on for a scene.
South, check blastia.
Backtrack until scene about surprise encounters.
Head north, exit to the left.
Go as far north as you can. Hit the blastia to the left.
Go back and to the left, hit blastia.
To the opened up path, head south, hit the blastia.
Leave to the north.
To the right. Blue save point.
Follow the lower path. Under first pillar is a blastia. Hit it.
Follow the path all the way around to another blastia.?
Hit the blastia on either sides of the large monster.
  +=========================================================================+
  |                           -- BOSS BATTLE --                             |
  +=========================================================================+
  |  Enemy  |   HP   |  TP  |  P.ATK | P.DEF | M.ATK | M.DEF | AGL  | W | R |
  |-------------------------------------------------------------------------|
  | Goliath |  19200 |  320 |   272  |  234  |   90  |   76  | 103  | - | - |
  |¯¯¯¯¯¯¯¯¯¯¯¯¯¯¯¯¯¯¯¯¯¯¯¯¯¯¯¯¯¯¯¯¯¯¯¯¯¯¯¯¯¯¯¯¯¯¯¯¯¯¯¯¯¯¯¯¯¯¯¯¯¯¯¯¯¯¯¯¯¯¯¯¯|
  |  Recommended Level: 9-11                                                |
  |                                                                         |
  |  Rita's spells are your best friend here. Goliath can be a bit of a     |
  |  powerhouse but shouldn't cause too much trouble.                       |
  |                                                                         |
  |  STRATEGY: You can do the usual surround the boss and pound him to      |
  |  death strategy. Just remember to keep well healed and have Rita in the |
  |  back using magic. While Estelle heals, and you and the other ally      |
  |  pound him from both sides.                                             |
  |                                                                         |
  |¯¯¯¯¯¯¯¯¯¯¯¯¯¯¯¯¯¯¯¯¯¯¯¯¯¯¯¯¯¯¯¯¯¯¯¯¯¯¯¯¯¯¯¯¯¯¯¯¯¯¯¯¯¯¯¯¯¯¯¯¯¯¯¯¯¯¯¯¯¯¯¯¯|
  | Drops: Antibiotics, Poison Ward                                         |
  | Secret Mission: "Defeat Goliath while attacking its Achilles' Heel      |
  | while it charged X Buster." (Don't worry about *killing*)               |
  +=========================================================================+
Out the way you came. You come to a scene and a small fight.
Keep leaving.
================
Aspio
================
Scene. To Rita's hut. Scene. Leave.
================
Halure
================
Scene. By the tree, talk to Rita. Backtrack. Overlimit tutorial. Leave.
===============
World Map
===============
Follow the road wast to Ehmead Hill.
.----------. .----------------------------( 07 )-------------------------------. | `----------´ | | || Ehmead Hill || | `-------------------------------------------------------------------------´
Playthrough Time: 1:23
Scene. Follow the path, scene. Up the path, scene.
First fork, go straight. Scene. Back to the first fork. Go right.
Second fork, go north. Third fork, go right.
Chest has 2 lift bottles. Save point.
Take bottom left path.
  +=========================================================================+
  |                            -- BOSS BATTLE --                            |
  +=========================================================================+
  | Enemy   |   HP  | TP | P. ATK | P. DEF | M. ATK |M. DEF |AGL|Weak|Resist|
  |-------------------------------------------------------------------------|
  | Gattuso | 26543 | 380|  288   |  245   |  141   |  122  |155|Fire| Wind |
  |¯¯¯¯¯¯¯¯¯¯¯¯¯¯¯¯¯¯¯¯¯¯¯¯¯¯¯¯¯¯¯¯¯¯¯¯¯¯¯¯¯¯¯¯¯¯¯¯¯¯¯¯¯¯¯¯¯¯¯¯¯¯¯¯¯¯¯¯¯¯¯¯¯|
  | Recommended Level: 13-17                                                |
  |                                                                         |
  | Strategy: Watch out for the flowers, they will stun you.                |
  | Take out the two littler guys in the beginning. Then for the big guy    |
  | attack him from the side or behind him. He hits pretty hard when you    |
  | get in front of him. If you see him wind up for a poison attack, make   |
  | sure you are out of the way. He does have a lower M. DEF and is weak to |
  | fire so use any fire artes you have. Rita's Fire Ball is great here.    |
  |                                                                         |
  | If you're struggling here try overlimit then constantly hacking away at |
  | him.                                                                    |
  |¯¯¯¯¯¯¯¯¯¯¯¯¯¯¯¯¯¯¯¯¯¯¯¯¯¯¯¯¯¯¯¯¯¯¯¯¯¯¯¯¯¯¯¯¯¯¯¯¯¯¯¯¯¯¯¯¯¯¯¯¯¯¯¯¯¯¯¯¯¯¯¯¯|
  | Drops: Power Light, Attack Ring, Great Wolf Fang                        |
  | Secret Mission: Use the billybally to strike down Gattuso.              |
  +=========================================================================+
Go west, scene. Leave. At the fork, go south. Scene. West to leave.
Follow the road to the next town.
.----------. .----------------------------( 08 )-------------------------------. | `----------´ | | || Port of Capua Nor || | `-------------------------------------------------------------------------´
Playthrough Time: 1:31
Scene. Go to the alley to the north. Battle, scene.
Talk to Karol and Rita next to the inn. Enter inn. Save point.
Enter back left room, scene. Leave inn.
Head west. Scene. Leave town, scene.
On the world map, Go down the road till a scene.
Go up the southern plateau/forest. you'll find the beast. Battle, and back to town.
To the inn, enter the back left door, scene. Leave inn.
Go west, scene. Go north to Raven, scene.
=================
Ragou's Mansion
=================
Straight for a scene.
Through the doors to the right, fight monsters until you get Small Key.
Go back a room, Go north. Fight enemies for Small Wolf Key.
Go back and to the left, scene.
Forward upstairs, scene. Save point, continue on.
 +===========================================================================+
 |                              -- BOSS BATTLE --                            |
 +===========================================================================+
 | Enemy |  HP   | TP  | P.ATK | P.DEF | M.ATK | M.DEF | AGL | Weak |Resist  |
 |---------------------------------------------------------------------------|
 | Zagi  | 31000 | 600 |  312  |  255  |  129  |   95  | 133 | Fire | Water  |
 |¯¯¯¯¯¯¯¯¯¯¯¯¯¯¯¯¯¯¯¯¯¯¯¯¯¯¯¯¯¯¯¯¯¯¯¯¯¯¯¯¯¯¯¯¯¯¯¯¯¯¯¯¯¯¯¯¯¯¯¯¯¯¯¯¯¯¯¯¯¯¯¯¯¯¯|
 | Recommended Level: 17-21                                                  |
 |                                                                           |
 | Strategy: Zagi has some hard hitting attacks, but as long as you manage   |
 | keep yourself healed up, it's really, really easy. He makes excessive use |
 | of aerial attacks this round, which are hard to dodge when you're in      |
 | front of him, but it also makes him a sitting duck when he lands.         |
 |                                                                           |
 |¯¯¯¯¯¯¯¯¯¯¯¯¯¯¯¯¯¯¯¯¯¯¯¯¯¯¯¯¯¯¯¯¯¯¯¯¯¯¯¯¯¯¯¯¯¯¯¯¯¯¯¯¯¯¯¯¯¯¯¯¯¯¯¯¯¯¯¯¯¯¯¯¯¯¯|
 |  Drops: Paralysis Ward, Thief's Cape                                      |
 |  Steal: Sage                                                              |
 |  Secret Mission: Lure Zagi to the edge of the ship and knock him          |
 |                  overboard.                                               |
 +===========================================================================+
.----------. .----------------------------( 09 )-------------------------------. | `----------´ | | || Port of Capua Torim || | `-------------------------------------------------------------------------´
Playthrough Time: 1:55
Enter the far west building(inn). Save point. Enter the back right door, scene
Talk to Raven. He is a little to the right.
Leave town to the left.
Follow the road/path. The city is a little hard to see.
.----------. .----------------------------( 10 )-------------------------------. | `----------´ | | || The Fallen City, Caer Bocram || | `-------------------------------------------------------------------------´
Playthrough Time: 2:01
Scene, go straight and check the cylinder object, scene.
Head left until you find a rectangle door in the ground. Scene.
Down the hole, scene.
Use the Sorcerer's Ring on the top left corner. Back up.
Head all the way right, enter the house. search for Password Clue 1.
Back to the cylinder, scene. Hit it with the Sorcerer's Ring.
Move forward in it.
Go Left, enter house on the end.
Save point downstairs.
Go all the way upstairs and through the door.
Hit the cylinder outside. Go left on it.
Enter the building on your right. Up the ladder. Hit the cylinder.
Go forward. Enter the building, go up the stairs.
Password Clue 3 is in the bookshelf to the right.
Go back to the edge of the cliff you were at and check it to go down.
Go all the way right, enter the door.
Go downstairs. Check desk for Password Clue 2.
Leave house. Go left until a scene (Fatal Strikes).
Battle. Hit the nearby cylinder. Go Left.
Enter the house next to you. Downstairs. Save point.
Down spiral stairs. Password: Sun
 +===========================================================================+
 |                              -- BOSS BATTLE --                            |
 +===========================================================================+
 | Enemy  |  HP   | TP  | P.ATK | P.DEF | M.ATK | M.DEF | AGL | Weak |Resist |
 |---------------------------------------------------------------------------|
 | Dreaded| 34800 | 500 |  330  |  380  |  240  |  140  | 24  | Fire | E, W, |
 | Giant  |       |     |       |       |       |       |     | Wind | L, D  |
 |¯¯¯¯¯¯¯¯¯¯¯¯¯¯¯¯¯¯¯¯¯¯¯¯¯¯¯¯¯¯¯¯¯¯¯¯¯¯¯¯¯¯¯¯¯¯¯¯¯¯¯¯¯¯¯¯¯¯¯¯¯¯¯¯¯¯¯¯¯¯¯¯¯¯¯|
 | Recommended Level: 19-23                                                  |
 |                                                                           |
 | It's one on one to start but not for long. People slowly come back. The   |
 | best bet is to attack from afar. Have Rita hit him with Spells while you  |
 | use something like Azure Edge. His attacks are strong but he is slow. His |
| attacks have a lag time. But you really can't defend against this guy. |
| His attacking range doesn't really allow for hit and run tactics. |
 | Remember that fatal Strikes do massive damage.                            |
 |                                                                           |
 |¯¯¯¯¯¯¯¯¯¯¯¯¯¯¯¯¯¯¯¯¯¯¯¯¯¯¯¯¯¯¯¯¯¯¯¯¯¯¯¯¯¯¯¯¯¯¯¯¯¯¯¯¯¯¯¯¯¯¯¯¯¯¯¯¯¯¯¯¯¯¯¯¯¯¯|
 |  Drops: Shield Light, Defense Ring                                        |
 |  Secret Mission: Hit his gut when he's standing up and vulerable.         |
 +===========================================================================+
Go outside, scene. Leave (jump down the cliff to the right).
Scene.
.----------. .----------------------------( 11 )-------------------------------. | `----------´ | | || The Rising City, Heliord || | `-------------------------------------------------------------------------´
Playthrough Time: 2:23
Leave to the south, scene. Go left and talk to Flynn.
Head to the nearby building, scene. Battle (Burst Artes tutorial).
Go back to the building (inn) and stay there.
Leave and go check the blastia (tall, spiral thing).
Enter the building to the right. Enter back room, talk to Flynn. Leave, scene.
Talk to Karol in the hallway. Back to the room, scene.
To the blastia, scene. Leave town to the left.
Follow the edge of the sea, then follow that path to the west. The town is obvious from there.
.----------. .----------------------------( 12 )-------------------------------. | `----------´ | | || The Den of Guilds, Dahngrest || | `-------------------------------------------------------------------------´
Playthrough Time: 2:37
Scene. Go north, scene. Back south, scene/battle.
Go north a little then take the first left. Scene/battle.
To the right and north. Scene.
Go south, take the second left and leave town.
Just keep moving through the trees until you see a dark green patch in the area.
.----------. .----------------------------( 13 )-------------------------------. | `----------´ | | || Forest of Keiv Moc || | `-------------------------------------------------------------------------´
Playthrough Time: 2:44
Scene. Forward up the tree, scene. Go south (on the mushroom path). Scene.
At fork go left, scene.
Go North then left. At the fork (by a light) go south to a lower area.
On next screen is a save point.
Up the path, the NEXT CHEST IS A MONSTER. Avoid.
Continue up the tree. At fork take upper path.
Keep going straight. Blue Save point. Continue on, Scene.
+===========================================================================+
 |                              -- BOSS BATTLE --                            |
 +===========================================================================+
 | Enemy     |  HP   | TP  | P.ATK | P.DEF | M.ATK |M.DEF| AGL | Weak |   R  |
 |---------------------------------------------------------------------------|
 | Gigalarva | 48000 | 440 |  358  |  399  |  260  | 185 | 184 | F, L,| E, W,|
 |           |       |     |       |       |       |     |     | S    | Wtr  |
 |¯¯¯¯¯¯¯¯¯¯¯¯¯¯¯¯¯¯¯¯¯¯¯¯¯¯¯¯¯¯¯¯¯¯¯¯¯¯¯¯¯¯¯¯¯¯¯¯¯¯¯¯¯¯¯¯¯¯¯¯¯¯¯¯¯¯¯¯¯¯¯¯¯¯¯|
 | Recommended Level: 21-25                                                  |
 |                                                                           |
 | He has a wide range so just run up and stay on him. Rita is great here.   |
 | Estelle's light artes are helpful also. Any other fire artes you have are |
 | wonderful. Just hit away at this guy.                                     |
 |                                                                           |
 |¯¯¯¯¯¯¯¯¯¯¯¯¯¯¯¯¯¯¯¯¯¯¯¯¯¯¯¯¯¯¯¯¯¯¯¯¯¯¯¯¯¯¯¯¯¯¯¯¯¯¯¯¯¯¯¯¯¯¯¯¯¯¯¯¯¯¯¯¯¯¯¯¯¯¯|
 |  Drops: Spicy Potion, Stun Bracelet, Great Crab Shell                     |
 |  Steal: Savory                                                            |
 |  Secret Mission: Hit him with Serpent as he tries to heal himself.        |
 +===========================================================================+
Leave the way you came.
===========
Dahngrest
===========
North to Guild HQ. Enter back middle door, scene.
Go outside to town square. Scene. Back to HQ, enter left door, scene.
Leave jail, back upstairs. Go to town square. Scene.
Head right to find Rita.
.----------. .----------------------------( 14 )-------------------------------. | `----------´ | | || The Tower of Gears, Ghasfarost || | `-------------------------------------------------------------------------´
Playthrough Time: 3:15
Scene. Battle 8 Bandido. (Let them gather around you and do Crushing Eagle a couple times.)
Scene. Door behind you is a blue save point.
Head left, scene. Enter bottom left door, scene.
OPTIONAL - Chest has Pineapple Gel and a Life Bottle is on the table
Leave.
Back by where you started, hit the switch.
Upstairs, scene. Leave to the south, scene.
Up the ladder. Head down the middle passage.
Shoot the gear with the ring. Head upstairs. Shoot gear to the left.
Go upstairs. Hit gear to the right. Head upstairs, gear is to the left. Upstairs.
Upstairs again, gear to the right. Up the stairs. Gear to the right.
BACK down twice. Hit the gear. Upstairs once, hit both gears.
Upstairs twice, hit both gears.
Up 3 sets of stairs. small gear to the right. Downstairs, gear to the right.
Downstairs, gear to the left. Upstairs, gear to the left.
Upstairs, gear to the left. Upstairs, gear to the left then 2 to the right.
Downstairs, gear to the right. Go all the way upstairs. Save point.
Keep going up, take elevator. Scene.
  +=========================================================================+
  |                            -- BOSS BATTLE --                            |
  +=========================================================================+
  | Enemy   |   HP   |  TP  | P. ATK | P. DEF | M. ATK | M. DEF |Weak|Resist|
  |-------------------------------------------------------------------------|
  | Barbos  |  49800 |  550 |  366   |  386   |  290   |   150  |--- | ---  |
  |-------------------------------------------------------------------------|
  |  Recommended Level: 24-26                                               |
  |                                                                         |
  |  STRATEGY: Take out the bridge supports right away. Then kill off the   |
| regular enemies. |
  |                                                                         |
  |  The tricky thing about this boss is that most of his moves either hit  |
  |  for a wide range area or the pull your characters into his range.      |
  |  This makes dodging and blocking a little hard, but not impossible.     |
  |                                                                         |
  |  Stay away from him while he is in overlimit because his combos do a    |
  |  big amount of damage and to more than one person. Use items as needed  |
  |  and force Estelle to use Nurse as often as possible to make sure your  |
  |  allies have enough health to withstand his attacks. If you can get     |
  |  the timing right, unleashing a combo on him will stop his attack and   |
  |  net you more time to heal.                                             |
  |                                                                         |
  |  Try to focus on getting your OL and unleashing it as soon as possible  |
  |  and also go for Fatal Strikes if they become available. If you can     |
  |  keep up the damage without getting wiped out, you should be fine.      |
  |                                                                         |
  |¯¯¯¯¯¯¯¯¯¯¯¯¯¯¯¯¯¯¯¯¯¯¯¯¯¯¯¯¯¯¯¯¯¯¯¯¯¯¯¯¯¯¯¯¯¯¯¯¯¯¯¯¯¯¯¯¯¯¯¯¯¯¯¯¯¯¯¯¯¯¯¯¯|
  | Drops: Demon Bone x 1, Blue Talisman x 1, Knuckle Duster x 1            |
  | Secret Mission: Destroying the Bridge Supports.                         |
  +=========================================================================+
Scene. Leave and back to Dahngrest.
.----------. .----------------------------( 15 )-------------------------------. | `----------´ | | || Dahngrest, Heliord, Torim || | `-------------------------------------------------------------------------´
Playthrough Time: 3:35
Scene. Walk to the knights. Stay at the inn, scene.
Go south, scene. Leave.
===========
World Map
===========
To Heliord.
Take few steps, scene. On the way another scene.
Talk to everyone? Talk to Repeed twice?
Go to sleep, and continue on.
=========
Heliord
=========
Stay at the inn. Scene. Leave, talk to judith to the left. Scene.
To the blastia, scene. Talk to the guard by the lift. Pick whoever.
Go to the item shop now. (If you don't have the items, fight till you do).
Back to the guard, scene. Chose someone, go into building. Scene.
Down the lift. Go down/right.
 +===========================================================================+
 |                              -- BOSS BATTLE --                            |
 +===========================================================================+
 | Enemy  |  HP   | TP  | P.ATK | P.DEF | M.ATK | M.DEF | AGL | Weak | Resist|
 |---------------------------------------------------------------------------|
 | Yeager | 18000 | 600 |  340  |  224  |  264  |  99   | 180 |   -  |   -   |
 |¯¯¯¯¯¯¯¯¯¯¯¯¯¯¯¯¯¯¯¯¯¯¯¯¯¯¯¯¯¯¯¯¯¯¯¯¯¯¯¯¯¯¯¯¯¯¯¯¯¯¯¯¯¯¯¯¯¯¯¯¯¯¯¯¯¯¯¯¯¯¯¯¯¯¯|
 | Recommended Level: 24-26                                                  |
 |                                                                           |
 | Strategy: Hope you brought a healer (or two). These guys are weak, but    |
 | they're pretty deadly together. They can easily surround and kill you. So |
 | focus on the small fry first, just one at a time. If you're using Yuri,   |
 | Crushing Eagle may be of some help. After enough of them are gone, you'll |
 | at least want to keep Yeager away from healers and casters. His attacks   |
 | can easily pierce your defenses and stun you if you're not cafeful, so    |
 | watch out!                                                                |
 +===========================================================================+
Back to Capua Torim (head east). Scene along the way.
=============
Capua Torim
=============
Stay at the Inn. Then talk to Karol, Rita is in the other room.
Head towards the exit of town for Judith. Estelle is to the south.
Raven is on the end of the first dock. Repede is in front of the inn.
Talk to the inkeeper to rest. Go towards the boats, scene.
Continue to the docks. Head down the first dock. Talk to Kaufman twice to leave.
Head south, scene/battle. Head west until scene.
.----------. .----------------------------( 16 )-------------------------------. | `----------´ | | || The Ghost Ship, Atherum || | `-------------------------------------------------------------------------´
Blue save point.
Note: When you split up, be sure to leave behind someone that you can control reasonably well.
Leave boat, head downstairs to the right.
Follow the path, Chest with a Lemon Gel along the way.
Go upstairs and then up more stairs.
In the door to the left, you'll come to a cutscene.
Climb up the mast. OPTIONAL - chest has Seal Bottle, Limit Bottle, Specific, and a Treat.
Go down the broken part of mast. Enter the second door.
Keep going till you reunite with everyone.
Save point, head upstairs. Continue on, scene. Check the table, scene/battle.
Exit through left door. Top left corner, scene.
Down two ladders. Check the hole in railing to the south.
Down the ladder, leave ship. Scene.
===========
World Map
===========
To Nordopolica! Head slightly southewest. It's at the very tip of a continent. You just have to get close to it.
.----------. .----------------------------( 17 )-------------------------------. | `----------´ | | || Nordopolica || | `-------------------------------------------------------------------------´
Playthrough Time: 4:20
Up to the Coliseum, enter. Save point
Go east, enter the door. Up the stairs, talk the left guard. Scene.
Stay at the inn, scene. Exit Coliseum, go downstairs untill a scene.
Back to the coliseum signup room, talk to Regaey. Scene.
Enter the tournament. After battle three, blondie comes in.
Just survive/run around. Scenes interfere the battle.
 +===========================================================================+
 |                              -- BOSS BATTLE --                            |
 +===========================================================================+
 | Enemy |  HP   | TP  | P.ATK | P.DEF | M.ATK | M.DEF | AGL | Weak | Resist |
 |---------------------------------------------------------------------------|
 | Zagi  | 60000 | 840 |  408  |  469  |  345  |  233  | 199 |   -  |    -   |
 |¯¯¯¯¯¯¯¯¯¯¯¯¯¯¯¯¯¯¯¯¯¯¯¯¯¯¯¯¯¯¯¯¯¯¯¯¯¯¯¯¯¯¯¯¯¯¯¯¯¯¯¯¯¯¯¯¯¯¯¯¯¯¯¯¯¯¯¯¯¯¯¯¯¯¯|
 | Recommended Level: 26-28                                                  |
 |                                                                           |
 | Strategy: He's obnoxious, but still beatable, as always. Spam your guard  |
 | and attack afterwards. Just don't let him pin you against the edge during |
 | overlimit, because he can easily kill you there.                          |
 |                                                                           |
 |¯¯¯¯¯¯¯¯¯¯¯¯¯¯¯¯¯¯¯¯¯¯¯¯¯¯¯¯¯¯¯¯¯¯¯¯¯¯¯¯¯¯¯¯¯¯¯¯¯¯¯¯¯¯¯¯¯¯¯¯¯¯¯¯¯¯¯¯¯¯¯¯¯¯¯|
 | Drops: Dice x 1, Drain Charm x 1                                          |
 | Secret Mission: Letting him charge his blastia till it explodes.          |
 +===========================================================================+
Fight a couple monsters, scene. Leave, by the inn is a scene.
Leave town to the south.
Follow the path to the next place.
.----------. .----------------------------( 18 )-------------------------------. | `----------´ | | || The Weasand of Cados || | `-------------------------------------------------------------------------´
Playthrough Time: 4:37
Battle. Continue taking the upper paths at forks until a scene triggers. Save point.
Take the second upper path, continue up. Keep going until a blue save point.
 +===========================================================================+
 |                              -- BOSS BATTLE --                            |
 +===========================================================================+
 | Enemy    |  HP   | TP  | P.ATK | P.DEF | M.ATK | M.DEF | AGL |Resist | WK |
 |---------------------------------------------------------------------------|
 | Pteropus | 66000 | 600 |  468  |  500  |  340  |  200  | 225 |WND, D | L  |
 |          |       |     |       |       |       |       |     |WTR    |    |
 |¯¯¯¯¯¯¯¯¯¯¯¯¯¯¯¯¯¯¯¯¯¯¯¯¯¯¯¯¯¯¯¯¯¯¯¯¯¯¯¯¯¯¯¯¯¯¯¯¯¯¯¯¯¯¯¯¯¯¯¯¯¯¯¯¯¯¯¯¯¯¯¯¯¯¯|
 | Recommended Level: 28-30                                                  |
 |                                                                           |
 | Strategy: This is a case were Karol is better than Estelle for healing.   |
 | I recommend Rita, and don't bring Raven/Estelle/Repede.                   |
 |                                                                           |
 | Pteropus itself isn't bad. But the bats he splits into? OH MY GOD. If you |
| are a Judith god, great. If not, overlimit and spam Tractor Beam, then |
| use her Burst Arte (both are wider-range). Take out those highly annoying |
 | Magic Bats. Battle will be smoother after they're gone.                   |
 |                                                                           |
 | If Pteropus reforms, he may split again.                                  |
 |                                                                           |
 |¯¯¯¯¯¯¯¯¯¯¯¯¯¯¯¯¯¯¯¯¯¯¯¯¯¯¯¯¯¯¯¯¯¯¯¯¯¯¯¯¯¯¯¯¯¯¯¯¯¯¯¯¯¯¯¯¯¯¯¯¯¯¯¯¯¯¯¯¯¯¯¯¯¯¯|
 | Drops: Speed Light x 1, Rebirth Ring x 1                                  |
 | Secret Mission: Defeat the leader bat.                                    |
 +===========================================================================+
Go outside.
=========
Mantaic
=========
Scene. Talk to everyone.
Raven - by shop
Karol - to the right a little
Rita - in the inn
Judith - try to leave town to the left
Estelle - by the oasis
To the inn, scene. Stay at the inn. Save point. Scene.
Go up to the oasis, scene. Leave town to the left, scene.
.----------. .----------------------------( 19 )-------------------------------. | `----------´ | | || The Sands of Kogorh || | `-------------------------------------------------------------------------´
Playthrough Time: 4:52
Note: Hit the cacti with the ring for more water. Fighting cacti give you water as well but takes longer.
Section 1:
XXXXXXXXXXXXXXXXXXXXXXXXXXXXXXXXXXXXXXXXXXXXXX[EXIT]XXXXXXXXXXXXX
XXXXXXXXXXXXXXXXXXXXXXXXXXXXXXXXXXXXXXXXXXXXXX XXXXXXXXXXXXX
XXXX XXXXXXXXXXXXXXXXXXXXXXXXXXXXX XXXX XX
XXX XXXXXXXXXXXXXXXXXXXXX X
XX XXXXXXXXXXX XX
XX XXX
XX XX
X XX
X XXX
X XXX
XX XXXX XX XXXX
XXX XXXXX XXXX XXXX
XXXX XXX XXX XXXXXX XXX
XXXX XXXXXXXXX XXXXXXX XXXXX
XXXXX XXXXXXXXXXXXX XXXXXXXXXXX XXX
XXXX XXXXXXXXXXXXXXXXXXXXXXXXXXXXXXX XXX
XXX XXXXXXXXXXXXXXXXXXXXXXXXXXXXXX XXX
X XXXXXXXXXXXXXXXXX XXXXXXXX XXXX
XX XXXXXX XXXXXXXX XX XXXX
XX XXXX XXX XXXXX
XXX XXX
XX XX
X XXXXXXX XXX
X XX XXXXXXXXXX XX
X XXXXXXXXX XXXXXXXXXXX XX
XX XXXXXXXXXXXXXXXXXXXXXXXXXX XXX
XXX XXXXXXXXXXXXXXXXXXXXX XXXX
XX XXXXXXXXXXXXXXXXXX XXXXXXXXXX
XX XXXXXXXX XX XXXXXXXXXXXX
XXX XXX XXXXXXXXX
XXXX XXXX
XX XXXX
XXX XXXXX
XXXXX XXXXXXXX
XXXXXX XXXXX XXXXXXXXXXXXXXXXXXXXXX XXXXXXXXXXXXX
XXXXXXXXXXXXXXXX[ENTER]XXXXXXXXXXXXXXXXXXXXXXXXXXXXXXXXXXXXXXXXXX
Next screen, scene. Save point. Continue north.
Section 2:
Watch out there is a Giganto [G]. Easily avoided though. Scene near the save point [S].
XXXXXXXXXXXXXX[EXIT]XXXXXXXXXXXXXXXXXXXXXXXXXXXXXXXXXXXXXXXXXXXXX
XXXXXXXXXXXXXX XXXXXXXXXXXXXXXXXXXXXXXXXXXX XX
XXXXXXXXXXX XXXXXXXXXXXXXXXXXXXX X
XXXX [S] XXXXXXXXXXXXX X
XXX X
XX XX
XX XXX
XX XXXX XX
X XXXXX XX XX
X XXX XXXXXXX XXXXX XXX
X XXXXXXXXXXXXXXXXXXXXXXXXX XXX
XX XXXXXXXXXXXXXXXXXXXXXXXXXXXX XX
XXX XXXXXXXXXXXXXXXXXXXXXXXXXXXXX XX
XXXX XXXXXXXXXXXXXXXXXXXXXXXXXXXXXXXX X
XXXX XXXXXXXXXXXXXXXXXXXXXXXXXXX X
XXXXX XXXXXXXXXXXXXXXXXXXXXX XX
XXXX XXXXXXXXXXXXX XXXXX XX
XXX XXXXXXXXX XX XX
X XXX
XX XX
XX XX
XXX XXXXX XXX
XX XXXXXXXXX XXXXXXXXXXX XX
X XXXXXXXXXXXXXXXXXXXXXXXXXXXXX X
X XXXXXXXXXXXXXXXXXXXXXXXXXXX X
X XXXXXXXXXXXXXXXXXXXXXXXXXXX X
XX XXXXXXXXXXXXXXXXXXXXXX X
XXX [G] XXXXXXXXXXXXXXXXXXXXXXXXXX X
XX XXXXXXXXXX X
XX XXXX XX
XXX XXXXX XXX XXXX
XXXXX XXXX XXXXX
XXXX XXX
XXX X
X X
XX XXXX X
XXX XXXXXX XXXXXXXXXX XXXXXXXXXX XX
XXXXXXXXXXXXXXXXXXXXXXXXXXXXXXXXXXXXX[ENTER]XXXXXXXXXXXXXXXXXXXXX
Next screen, boss.
 +===========================================================================+
 |                              -- BOSS BATTLE --                            |
 +===========================================================================+
 | Enemy    |  HP   | TP  | P.ATK | P.DEF | M.ATK | M.DEF | AGL | Weak  | R  |
 |---------------------------------------------------------------------------|
 |Outbreaker| 78925 | 660 |  498  |  505  |  314  |  108  | 222 |  WTR  | F  |
 |¯¯¯¯¯¯¯¯¯¯¯¯¯¯¯¯¯¯¯¯¯¯¯¯¯¯¯¯¯¯¯¯¯¯¯¯¯¯¯¯¯¯¯¯¯¯¯¯¯¯¯¯¯¯¯¯¯¯¯¯¯¯¯¯¯¯¯¯¯¯¯¯¯¯¯|
 | Recommended Level: 29-32                                                  |
 |                                                                           |
 | Strategy: Ugh, a floater. Packs a bit of a punch too. Repede's a bad      |
 | option here, but Rita should damn well be a god. He's surprisingly easy   |
 | to simply beat up. The easiest method is to use Rita. Use Splash during   |
 | the day, Fireball at night.                                               |
 |                                                                           |
 |¯¯¯¯¯¯¯¯¯¯¯¯¯¯¯¯¯¯¯¯¯¯¯¯¯¯¯¯¯¯¯¯¯¯¯¯¯¯¯¯¯¯¯¯¯¯¯¯¯¯¯¯¯¯¯¯¯¯¯¯¯¯¯¯¯¯¯¯¯¯¯¯¯¯¯|
 | Drops: Mysterious Piece x 1, World Charm x 1                              |
 | Secret Mission: Destroy the core.                                         |
 +===========================================================================+
Scene.
.----------. .----------------------------( 20 )-------------------------------. | `----------´ | | || The Heartland Town, Yormgen || | `-------------------------------------------------------------------------´
Playthrough Time: 5:03
Save point. Exit the inn, scene. Head north and take a right onto the deck.
Talk to the lady near the chest, scene.
Go all the way north, enter the Sage's place. Scene.
Rest at the inn. Head to the exit. Scene.
Head back through the desert, STAY ON THE FIELD and go back to Mantaic.
=========
Mantaic
=========
Scene. Go by the oasis (path that leads right)?? Speak to the two kids, scene.??
Stay at the inn, scene. To the oasis, scene. Leave town to the right.
==================
Weasand of Cados
==================
Shouldn't be hard to find the way back through here.
Once out, follow the road to Noropolica.
.----------. .----------------------------( 21 )-------------------------------. | `----------´ | | || Nordopolica || | `-------------------------------------------------------------------------´
Playthrough Time: 5:30
Stay at the inn. Talk to Natz. (to the right, enter door, upstairs, guy on the left)
Go all the way up the stairs, enter the room. Scene.
All the way back down. Scene. Enter door right in front of you.
 +===========================================================================+
 |                              -- BOSS BATTLE --                            |
 +===========================================================================+
 | Enemy  |  HP   | TP  | P.ATK | P.DEF | M.ATK | M.DEF | AGL | W |     R    |
 |---------------------------------------------------------------------------|
 | Belius | 96000 | 700 |  505  |  500  |  496  |  369  | 369 | E | W, WTR, L|
 |¯¯¯¯¯¯¯¯¯¯¯¯¯¯¯¯¯¯¯¯¯¯¯¯¯¯¯¯¯¯¯¯¯¯¯¯¯¯¯¯¯¯¯¯¯¯¯¯¯¯¯¯¯¯¯¯¯¯¯¯¯¯¯¯¯¯¯¯¯¯¯¯¯¯¯|
 | Recommended Level: 32-35                                                  |
 |                                                                           |
 | Strategy: Belius is pretty easy, actually. When she goes into overlimit,  |
 | just stay back. Her combos are a tad brutal, so don't be shy about        |
 | guarding. She gets particularly nasty when she brings out the ice. When   |
 | you get her HP down about halfway, she splits into two. Instead of taking |
 | both on, get the secret mission and put the lights back on. Just take     |
 | Yuri to all four lamps and light them with Destruction Field. Afterwards, |
 | just pound her to submission.                                             |
 |                                                                           |
 |¯¯¯¯¯¯¯¯¯¯¯¯¯¯¯¯¯¯¯¯¯¯¯¯¯¯¯¯¯¯¯¯¯¯¯¯¯¯¯¯¯¯¯¯¯¯¯¯¯¯¯¯¯¯¯¯¯¯¯¯¯¯¯¯¯¯¯¯¯¯¯¯¯¯¯|
 | Drops: Emerald Ring x 1, Ice Coffin x 1                                   |
 | Secret Mission: Light the lamps.                                          |
 +===========================================================================+
Leave. To the boat.
Save point. Walk outside and talk to everyone. Go back inside to rest.
Head north from Nordopolica untill you reach a beach. Then run to Dahngrest.
===========
Dahngrest
===========
Go to the inn. Rest. Scene, take the western exit.
Go west past Keiv Moc and head across the bridge. Head up the slope and your destination is obvious.
.----------. .----------------------------( 22 )-------------------------------. | `----------´ | | || The Manor of the Wicked || | `-------------------------------------------------------------------------´
Playthrough Time: 5:56
Head inside, scene and battle. Go up the stairs, save point.
Down the hallway, enter the door at the very end. Scene and battle.
Back to Dahngrest.
===========
Dahngrest
===========
To the center of town for a scene. Head outside and to the west.
Talk to Karol by the tavern then Estelle near the inn. Head to the east exit.
Go to the beach by Yormgen. Then head north through mountains untill you reach Mt. Temza.
.----------. .----------------------------( 23 )-------------------------------. | `----------´ | | || Mt. Temza || | `-------------------------------------------------------------------------´
Playthrough Time: 6:08
Continue to the next screen. At a fork, take the upper path.
Just follow the main path until a bridge and a scene. Save point.
Go Right and to the next screen. At the fork take the upper east path.
Blue save point.
 +===========================================================================+
 |                              -- BOSS BATTLE --                            |
 +===========================================================================+
 | Enemy |  HP   |  TP  | P.ATK | P.DEF | M.ATK | M.DEF |  AGL  |  W   |  R  |
 |---------------------------------------------------------------------------|
 | Tison | 71258 | 1080 |  521  |  500  |  376  |  225  |  233  |  -   |  -  |
 | Nan   | 56851 | 1400 |  456  |  408  |  343  |  335  |  198  |  -   |  -  |
 |¯¯¯¯¯¯¯¯¯¯¯¯¯¯¯¯¯¯¯¯¯¯¯¯¯¯¯¯¯¯¯¯¯¯¯¯¯¯¯¯¯¯¯¯¯¯¯¯¯¯¯¯¯¯¯¯¯¯¯¯¯¯¯¯¯¯¯¯¯¯¯¯¯¯¯|
 | Recommended Level: 36-38                                                  |
 |                                                                           |
 | Strategy: Tison's fast and furious, and Nan likes to cast *and* attack.   |
 | She ain't bad at both, lemme tell ya. Never let up on these two. It hurts |
 | when they decide to Mystic Arte your ass. Otherwise, all you have to      |
| worry about is their deadly combos. I would suggest taking out Nan first |
 | as she can use resurrection and healing artes.                            |
 |                                                                           |
 | If you do take Tison down first just don't let Nan cast! You don't want   |
 | to have to beat Tison again.                                              |
 |                                                                           |
 | This is not a good battle to have multiple casters in, though the AI for  |
 | melee people is really dumb. Especially Judith, who is sadly forced.      |
 |                                                                           |
 |¯¯¯¯¯¯¯¯¯¯¯¯¯¯¯¯¯¯¯¯¯¯¯¯¯¯¯¯¯¯¯¯¯¯¯¯¯¯¯¯¯¯¯¯¯¯¯¯¯¯¯¯¯¯¯¯¯¯¯¯¯¯¯¯¯¯¯¯¯¯¯¯¯¯¯|
 | Drops: Special Flag, Protect Ring, Death Scythe, Resist Ring              |
 | Secret Mission: Knock them down after they get their weapons stuck.       |
 +===========================================================================+
In to the cave!
Talk to everyone (Judith last to move on).
To Phaeroh's Crag (spiky rocks in middle of desert).
Scene. Follow the path, scene.
To Aspio.
Walk as judith, speak to the Krityan in the center area.
Go to Rita's hut. Leave.
Go to the middle continent to the south. Roughly southwest of Aspio. You'll see a stone thingy in a foresty area.
And you can see Nordopolica from there (they're very close to each other).
.----------. .----------------------------( 24 )-------------------------------. | `----------´ | | || Egothor Forest || | `-------------------------------------------------------------------------´
Playthrough Time: 6:36
Go along the main path until a scene. Go up the hill and cross the high bridge.
Contunue up, scene. Go back to where the first scene was.
Cross bridge to the right now. Enter cave. Scene.
At the fork, go straight until a save point. Head north up the cliff, scene.
Just enter Myorzo while flying on Ba'ul.
.----------. .----------------------------( 25 )-------------------------------. | `----------´ | | || Myorzo || | `-------------------------------------------------------------------------´
Playthrough Time: 6:45

Up the ramp, and go through the door. Scene.
Note: You should take off Estelle and Raven's accessories now.

Go to the red roofed house. Scene. To the right building(inn), scene.
Go to the area you started in, scene.
Go back into the city, then right back out. Scene. Head to Yormgen, scene. Speak with Flynn. Fly over the continent where Egothor Forest is, east of Nordapolica. Scene..----------. .----------------------------( 26 )-------------------------------. | `----------´ | | |Playthrough Time: 7:05 Optional - Left chest has a Pineapple Gel. Up a little and behind the pink flower bush is a Life Bottle.| The Forgotten Shrine, Baction || | `-------------------------------------------------------------------------´
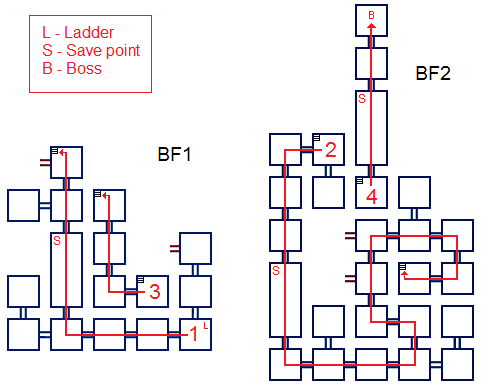
Enter, and go down the ladder.
Follow the map below. You start in BF1 at the bottom right corner.
 +===========================================================================+
 |                              -- BOSS BATTLE --                            |
 +===========================================================================+
 | Enemy   |   HP   | TP  | P.ATK | P.DEF | M.ATK | M.DEF | AGL |  W  |   R  |
 |---------------------------------------------------------------------------|
 | Schwann | 148000 |1800 |  578  |  708  |  412  | 588   | 452 |  -  |   -  |
 |¯¯¯¯¯¯¯¯¯¯¯¯¯¯¯¯¯¯¯¯¯¯¯¯¯¯¯¯¯¯¯¯¯¯¯¯¯¯¯¯¯¯¯¯¯¯¯¯¯¯¯¯¯¯¯¯¯¯¯¯¯¯¯¯¯¯¯¯¯¯¯¯¯¯¯|
 | Recommended Level: 38-44                                                  |
 |                                                                           |
 | Strategy: Karol is a nice healer, if you haven't used him. Not as good as |
 | Raven or Estelle in some regards, but nice. Anyways, he's pretty strong,  |
 | but nothing you can't handle, assuming you have a good supply of items    |
 | for the extreme cases. Just gang up on him and hammer him with spells.    |
 | It's one against four - he's easy to stagger. Just nail him on the wall   |
 | and attack attack attack! All you have to watch out for his his hard      |
 | hitting attacks and extreme speed. Don't be afraid to use nice items.     |
 |                                                                           |
 |¯¯¯¯¯¯¯¯¯¯¯¯¯¯¯¯¯¯¯¯¯¯¯¯¯¯¯¯¯¯¯¯¯¯¯¯¯¯¯¯¯¯¯¯¯¯¯¯¯¯¯¯¯¯¯¯¯¯¯¯¯¯¯¯¯¯¯¯¯¯¯¯¯¯¯|
 |  Drops: Force Ring, Imperial Prestige                                     |
 |  Secret Mission: Hit him as he clutches his chest after using his Mystic  |
 |                  Arte.                                                    |
 +===========================================================================+

To Heracles. It's in the sea next to Zaphias.
.----------. .----------------------------( 27 )-------------------------------. | `----------´ | | |Playthrough Time: 7:23 Head left, down the stairs. Keep going down stairs until you find a door.| The Mobile Fortress, Heracles || | `-------------------------------------------------------------------------´
Enter and head forward, scene.
Down the stairs, use the machine to the left.
Go through the big door. Scene.

Head to the right door on the same level.
Go up and enter the door at the top.
Follow the path until you reach a ladder.
Push the block to the next screen, destroy the wall with the Socerer's Ring, and push the block over the edge.

Hit the yellow contraption at the south with the Sorcerer's Ring.
Go down the ladder next to the stairs.
Head up next ladder and at the south end of that platform hit the moving blocks.
try to destroy the machine below.

Head down the ladder, then down the one to the left.
Stand on the first piece of metal on the floor and hit a block, destroy machine.
Go back to the main bridge with the barriers, hit the machine at the end.
Go back to where you were, and down the last ladder.
Move the lift to the upper level, push the block to destroy the machine.
To the bridge, save point.

 +===========================================================================+
 |                              -- BOSS BATTLE --                            |
 +===========================================================================+
 | Enemy|   HP   |  TP  | P.ATK | P.DEF | M.ATK | M.DEF |  AGL  |  W  |   R  |
 |---------------------------------------------------------------------------|
 | Zagi | 175000 | 1240 |  624  |  771  |  444  | 422   |  212  |  -  |   -  |
 |¯¯¯¯¯¯¯¯¯¯¯¯¯¯¯¯¯¯¯¯¯¯¯¯¯¯¯¯¯¯¯¯¯¯¯¯¯¯¯¯¯¯¯¯¯¯¯¯¯¯¯¯¯¯¯¯¯¯¯¯¯¯¯¯¯¯¯¯¯¯¯¯¯¯¯|
 | Recommended Level: 40-45                                                  |
 |                                                                           |
 | Strategy: You want Karol. Anyways, there's nothing special about this     |
 | Zagi. You've fought him before several times. You know what he's about by |
 | now. Just pound away like you've been doing. Eventually, he'll poison     |
 | himself. Freak. This is the reason I wanted you to bring Karol - use Nice |
 | Recovery Smash on Zagi. Yes, heal your enemy. Just do it.                 |
 |¯¯¯¯¯¯¯¯¯¯¯¯¯¯¯¯¯¯¯¯¯¯¯¯¯¯¯¯¯¯¯¯¯¯¯¯¯¯¯¯¯¯¯¯¯¯¯¯¯¯¯¯¯¯¯¯¯¯¯¯¯¯¯¯¯¯¯¯¯¯¯¯¯¯¯|
 |  Drops: Dark Seal, Poison Charm                                           |
 |  Secret Mission: Remove his poison status with Karol.                     |
 +===========================================================================+

Leave. Head down the ladders till you reach the south exit. Go through the big door again.
Down the stairs until a scene. Head up the right stairs, enter door.
Enter the elevator. Go up the stairs, scene.
Leave for the southeast exit.
Leave inn, scene. Back to inn, speak with everyone.
Leave town.Follow the road. It will turn north, pass Ehmead Hill and keep going north. You'll eventually hit the dungeon....----------. .----------------------------( 28 )-------------------------------. | `----------´ | | || The Blade Drifts of Zopheir || | `-------------------------------------------------------------------------´
Playthrough Time: 7:51

Follow the path until a scene. Backtrack to the opened path.
Follow the path, north at the fork. Scene. Backtrack to the opened path.North until scene. Backtrack till you can go east.Save point, Boss. +===========================================================================+ | -- BOSS BATTLE -- | +===========================================================================+ | Enemy | HP | TP | P.ATK | P.DEF | M.ATK | M.DEF | AGL | W | R | |---------------------------------------------------------------------------| | Baitojoh | 204640 | 1000 | 634 | 699 | 540 | 342 | 224 | - | - | |¯¯¯¯¯¯¯¯¯¯¯¯¯¯¯¯¯¯¯¯¯¯¯¯¯¯¯¯¯¯¯¯¯¯¯¯¯¯¯¯¯¯¯¯¯¯¯¯¯¯¯¯¯¯¯¯¯¯¯¯¯¯¯¯¯¯¯¯¯¯¯¯¯¯¯| | Recommended Level: 44-49 | | | | Strategy: Gah, I suck at using Karol. Just focus on staying alive through | | that bit. Eventually that bit will stop (THANK GOD). Free run is your | | friend, lover, god, etc. | | | | This guy is cake. Really. The only major problem is that he flies, and I | | I hate all enemies that fly. As long as you can hit him, there should be | | no problem. All you have to watch out for is the attacks that hit anyone | | under (or above) him. | |¯¯¯¯¯¯¯¯¯¯¯¯¯¯¯¯¯¯¯¯¯¯¯¯¯¯¯¯¯¯¯¯¯¯¯¯¯¯¯¯¯¯¯¯¯¯¯¯¯¯¯¯¯¯¯¯¯¯¯¯¯¯¯¯¯¯¯¯¯¯¯¯¯¯¯| | Drops: Paralysis Charm, Body Paint | | Steal: Saffron | | Secret Mission: Hit the fin as it sticks out of the ground three times. | +===========================================================================+ Head north. Take upper path at fork. Right at next fork. Leave.
NOTE: Don't ride the boat. There is a glitch.
=========
Halure
=========
To get there - Take the first right. You'll pass Shaikos Ruins.
You should be able to find it from there.
To the inn. To the Mayor's place. Back to inn. Leave.
Go southwest to Quoi Woods. Go to the save point here. Then to Zaphias..----------. .----------------------------( 29 )-------------------------------. | `----------´ | | |Playthrough Time: 8:18 To the castle, enter. Go right, then north. Scene.| Zaphias || | `-------------------------------------------------------------------------´
Save point. OPTIONAL - Can eat curry to the right for full HP/TP.Leave room. Take southwest most exit.
Head north. Save point.(This is the center room)
Go north. Scene. Check the door atop the stairs.Exit south. Go east then north. Hit statue with ring.
Back down, left to center room. Exit south. Go west, south, west.Hit it. Back to center room.
Head west then north. Hit statue. Back to the center room.
Go south, east, south, east, north. Hit it. Backtrack to center room.
Head north. Hit the door, enter. Save point.

 +===========================================================================+
 |                              -- BOSS BATTLE --                            |
 +===========================================================================+
 | Enemy     |   HP  |  TP  | P.ATK | P.DEF | M.ATK | M.DEF | AGL | W  |  R  |
 |---------------------------------------------------------------------------|
 | Estellise | 68000 | 1600 |  625  |  700  |  588  |  379  | 228 | -  |  -  |
 |¯¯¯¯¯¯¯¯¯¯¯¯¯¯¯¯¯¯¯¯¯¯¯¯¯¯¯¯¯¯¯¯¯¯¯¯¯¯¯¯¯¯¯¯¯¯¯¯¯¯¯¯¯¯¯¯¯¯¯¯¯¯¯¯¯¯¯¯¯¯¯¯¯¯¯|
 | Recommended Level: 45-50                                                  |
 |                                                                           |
 | Strategy: It's a case of four on one, and she ain't the strongest. She    |
 | shouldn't suprise you too much. I had four melee people pounding on her   |
 | at the edge of the battlefield, and it worked out more than just fine.    |
 | She's a pushover with low HP.                                             |
 |                                                                           |
 | As for part two, try to get her against the wall. She's considerably      |
 | harder alone. If she overlimits, run like hell XD Azure Edge is nice.     |
 | If you have the Mother's Momento use it during this second part.          |
 |¯¯¯¯¯¯¯¯¯¯¯¯¯¯¯¯¯¯¯¯¯¯¯¯¯¯¯¯¯¯¯¯¯¯¯¯¯¯¯¯¯¯¯¯¯¯¯¯¯¯¯¯¯¯¯¯¯¯¯¯¯¯¯¯¯¯¯¯¯¯¯¯¯¯¯|
 |  Drops: Second Star, Strange Mirror, Reflect Ring                         |
 |  Secret Mission: Use the Mother's Momento on her.                         |
 +===========================================================================+
Head north and exit right.
Go south, right, right. Talk to Raven in the cell.
Head left and north. Talk to Rita and Estelle.
Leave south, go left, up, enter dining room on the right. Talk to Karol. Leave room.Take the southwest exit, talk to Judith.
Head right, down. Talk to the man in yellow. Scene.
Leave down the right steps. Leave town to the right.
You can call Ba'ul now.
Zaude is the middle of the sea, south of Dahngrest. Scene when you get close.OPTIONAL -----------------------------------------------------------------------------------------------------------------------
Side Quest - Labyrinth Of Memories If you want to open the EX DUNGEON to grind to level 200, you must do this now! Go to Phaeroh's Crag. Enter the warp. Head to the Sage's place. Talk to the guy twice and rest. OPTIONAL -----------------------------------------------------------------------------------------------------------------------
.----------. .----------------------------( 30 )-------------------------------. | `----------´ | | |Playthrough Time: 8:42| The Enduring Shrine of Zaude || | `-------------------------------------------------------------------------´
NOTE: You will lose Dein Nomos at the end of this dungeon. Make sure you get the skills off it!Go right, save point. Check the vent. Enter.
Down the stairs, go left.
The north end of the next room has a lot of chests. The one you need is in the middle - Zaude Orb.The other optional chests have 15000 gald, Panacea Bottle, 20000 gald, Moon Cloak, Special Gel,
Life Bottle, Limit Bottle, and a Splash Dress.
Backtrack a room, go to the center path.Check the blue circle, hit it with your ring. Exit south. Go southwest, scene. Up the stairs and enter the north door.
Save point, enter the door.

 +===========================================================================+
 |                              -- BOSS BATTLE --                            |
 +===========================================================================+
 | Enemy  |   HP   |  TP  | P.ATK | P.DEF | M.ATK | M.DEF |  AGL |  W  |  R  |
 |---------------------------------------------------------------------------|
 | Yeager | 230000 | 1700 |  669  |  798  |  720  |  400  |  244 |  -  |  -  |
 |¯¯¯¯¯¯¯¯¯¯¯¯¯¯¯¯¯¯¯¯¯¯¯¯¯¯¯¯¯¯¯¯¯¯¯¯¯¯¯¯¯¯¯¯¯¯¯¯¯¯¯¯¯¯¯¯¯¯¯¯¯¯¯¯¯¯¯¯¯¯¯¯¯¯¯|
 | Recommended Level: 47-52                                                  |
 |                                                                           |
 | Strategy: Raven. You want Raven. Anyways, this guy has some killer combos |
 | but you can take him. He's also uber fast and has ranged attacks to boot. |
 | But all you really have to do is gang up on him and he'll die soon enough |
 | without a ton of effort. If he's getting to be a problem, just find an    |
 | arte that will knock him over. I find that Lone Wolf Storm is nice, but   |
 | that's an altered arte.                                                   |
 |                                                                           |
 | Once you drop his HP enough, he'll show his "true" power. His MA may look |
 | cool, but it certainly hurts!                                             |
 |¯¯¯¯¯¯¯¯¯¯¯¯¯¯¯¯¯¯¯¯¯¯¯¯¯¯¯¯¯¯¯¯¯¯¯¯¯¯¯¯¯¯¯¯¯¯¯¯¯¯¯¯¯¯¯¯¯¯¯¯¯¯¯¯¯¯¯¯¯¯¯¯¯¯¯|
 |  Drops: Splash Bow, Alexandrite                                           |
 |  Secret Mission: Hit him with Rain when his guard is broken during part 2 |
 |                  of the battle.                                           |
 +===========================================================================+
In the next room, Go right twice. Up the stairs.
Push the block off the south end of the platform.Push it on top the square at the south end of the screen.
Hit the blue switch. Go push the block to make a path.
From the LEFT SIDE of the CRACK IN THE FLOOR, hit the red switch.Head left until you go down stairs.
Push the left most block all the way right and into the water.
Push the block with the orb all the way left and down.
Stand on the block in the water and hit the orb.
Open the right chest for the Red Orb. (Other chest has Lemon Gel)
Hit the center statue, head left and down.
Go right twice and put the orb in the pedestal.
Place the orb in the pedestal you passed before, hit it.
Go back left, hit the red switch to make the water fall.
Down the stairs, exit to the right.

Go up through the center door and through the next door.
Fight, scene, save point. Through the door.
NOTE: This is where you will lose Dein Nomos. +===========================================================================+ | -- BOSS BATTLE -- | +===========================================================================+ | Enemy | HP | TP | P.ATK | P.DEF | M.ATK | M.DEF | AGL | W | R | |---------------------------------------------------------------------------| | Alexei | 305550 | 2800 | 700 | 690 | 600 | 480 | 263 | - | - | |¯¯¯¯¯¯¯¯¯¯¯¯¯¯¯¯¯¯¯¯¯¯¯¯¯¯¯¯¯¯¯¯¯¯¯¯¯¯¯¯¯¯¯¯¯¯¯¯¯¯¯¯¯¯¯¯¯¯¯¯¯¯¯¯¯¯¯¯¯¯¯¯¯¯¯| | Recommended Level: 49-54 | | | | Strategy: He has some hard hitting attacks, but he's just another, normal | | case of four on one. He does have some techs to watch out for, such as | | his ice attack, and many of his attacks hit behind him. He's slightly | | difficult to get staggered, but just keep hacking away with all you have | | and he'll crack eventually. | | | | After a while, he'll use Brilliant Cataclysm, his MA. IT HURTS. Hope you | | are behind him or out of reach when he uses it. | |¯¯¯¯¯¯¯¯¯¯¯¯¯¯¯¯¯¯¯¯¯¯¯¯¯¯¯¯¯¯¯¯¯¯¯¯¯¯¯¯¯¯¯¯¯¯¯¯¯¯¯¯¯¯¯¯¯¯¯¯¯¯¯¯¯¯¯¯¯¯¯¯¯¯¯| | Drops: Spring of Wisdom, Faerie Ring | | Steal: Red Verbena | | Secret Mission: Knock him over while he recovers from using his MA. | +===========================================================================+.----------. .----------------------------( 31 )-------------------------------. | `----------´ | | |Playthrough Time: 9:07| Zaphias, Aspio, Dahngrest || | `-------------------------------------------------------------------------´
Zaphias -
Head outside, scene near the stairs. Back out, up the stairs for a scene.

Aspio -
Head up, scene. To Rita's house, speak to her.

Dahngrest -
To the central area, scene. To the Union HQ.
.----------. .----------------------------( 32 )-------------------------------. | `----------´ | | |Playthrough Time: 9:18 Approach it from the EAST side. Go back to the huge spiky crystal where the boss battle was.| Zopheir || | `-------------------------------------------------------------------------´
Check the crystal and play the short minigame. Leave, scene.
.----------. .----------------------------( 33 )-------------------------------. | `----------´ | | |Playthrough Time: 9:28 Battle outside of the city. +===========================================================================+ | -- BOSS BATTLE -- | +===========================================================================+ | Enemy | HP | TP | P.ATK | P.DEF | M.ATK | M.DEF | AGL | W | R | |---------------------------------------------------------------------------| |Daybreaker| 142210 | 720 | 640 | 581 | 480 | 216 | 222 | WTR | F | | Night | 142210 | 720 | 588 | 506 | 607 | 499 | 222 | F | WTR | |¯¯¯¯¯¯¯¯¯¯¯¯¯¯¯¯¯¯¯¯¯¯¯¯¯¯¯¯¯¯¯¯¯¯¯¯¯¯¯¯¯¯¯¯¯¯¯¯¯¯¯¯¯¯¯¯¯¯¯¯¯¯¯¯¯¯¯¯¯¯¯¯¯¯¯| | Recommended Level: 51-55 | | | | Strategy: Ugh, I hate floating/flying enemies. They're more of a nuisance | | than genuinely strong, however. They have spells and such, but are simply | | pushovers. Nothing compared to last time, even. They're even ridiculously | | slow! Be embarrassed if you lose. || Nordopolica || | `-------------------------------------------------------------------------´
| || <Arna> I played as Raven just spammed Azure Heavens and it was over fast. |
 |¯¯¯¯¯¯¯¯¯¯¯¯¯¯¯¯¯¯¯¯¯¯¯¯¯¯¯¯¯¯¯¯¯¯¯¯¯¯¯¯¯¯¯¯¯¯¯¯¯¯¯¯¯¯¯¯¯¯¯¯¯¯¯¯¯¯¯¯¯¯¯¯¯¯¯|
 |  Steal: Red Chamomile                                                     |
 +===========================================================================+

Head out, scene. To the boat, scene.
=============Phaeroh=============Go near Phaeroh's crag. He is flying around, go near him for a scene.
The Crystallands is north of Capua Torim..----------. .----------------------------( 34 )-------------------------------. | `----------´ | | |Playthrough Time: 9:33 Follow the path, when you encounter crystals blocking the path. Hit them to pass.| The Erealumen Crystallands || | `-------------------------------------------------------------------------´
Eventually you will find a wide area with a tall crystal. Hit it to make a bridge and cross.
Head east and at the fork go northeast, scene. Save point.
Head north, then right. At the next fork go north. Save Point.
Chest has 3 life bottles +===========================================================================+ | -- BOSS BATTLE -- | +===========================================================================+ | Enemy | HP | TP | P.ATK | P.DEF | M.ATK | M.DEF | AGL | R | W | |---------------------------------------------------------------------------| | Gusios | 321020 | 1400 | 705 | 712 | 500 | 280 | 188 | E, W, | F, | | | | | | | | | | L, S |WND | |¯¯¯¯¯¯¯¯¯¯¯¯¯¯¯¯¯¯¯¯¯¯¯¯¯¯¯¯¯¯¯¯¯¯¯¯¯¯¯¯¯¯¯¯¯¯¯¯¯¯¯¯¯¯¯¯¯¯¯¯¯¯¯¯¯¯¯¯¯¯¯¯¯¯¯| | Recommended Level: 51-55 | | | | Strategy: Notice his M. DEF is super low in comparison to everything else | | - oh Riiitaa~! Anyways, this guy is HUGE. He easily staggers you. You're | | a fly, really. Wind/Fire artes are HIGHLY recommended for this guy, as | | opposed to the regular hack 'n slash. His ground shaker attack is pretty | | annoying when he decides to trap you in one, however. He uses a wide area | | water attack that is *extremely* annoying towards the end. | | | |¯¯¯¯¯¯¯¯¯¯¯¯¯¯¯¯¯¯¯¯¯¯¯¯¯¯¯¯¯¯¯¯¯¯¯¯¯¯¯¯¯¯¯¯¯¯¯¯¯¯¯¯¯¯¯¯¯¯¯¯¯¯¯¯¯¯¯¯¯¯¯¯¯¯¯| | Drop: Strange Stone, Amulet | | Secret Mission: Knock him down as he's getting on his hind legs to | | attack. | +===========================================================================+ Leave the dungeon. To the southeast continent. It's where the #20 is. .----------. .----------------------------( 35 )-------------------------------. | `----------´ | | |Playthrough Time: 9:52 Follow the path down to a fork. Go left. First chest is a Life Bottle.| Relewiese Hollows || | `-------------------------------------------------------------------------´
At the fork take the left path then left again. Next chest is a Pineapple Gel.
Left at fork, scene. Save point.

Head east then south at fork. Go right until a save point.
Enter the cave and follow the path.

 +===========================================================================+
 |                              -- BOSS BATTLE --                            |
 +===========================================================================+
 | Enemy  |   HP   |  TP  | P.ATK | P.DEF | M.ATK | M.DEF | AGL | W  |   R   |
 |---------------------------------------------------------------------------|
 | Khroma | 393300 | 1400 |  722  |  695  |  850  |  462  | 180 |E, S| F, L, |
 | Dragon |        |      |       |       |       |       |     |    |  WD   |
 |¯¯¯¯¯¯¯¯¯¯¯¯¯¯¯¯¯¯¯¯¯¯¯¯¯¯¯¯¯¯¯¯¯¯¯¯¯¯¯¯¯¯¯¯¯¯¯¯¯¯¯¯¯¯¯¯¯¯¯¯¯¯¯¯¯¯¯¯¯¯¯¯¯¯¯|
 | Recommended Level: 52-57                                                  |
 |                                                                           |
 | Strategy: She's surprisingly easy to get against the wall. Just surround  |
 | and pound on her. She *will* get some hits on you, but really, she's      |
 | pathetic. Even in overlimit. Only a couple attacks are annoying, but that |
 | is why you should have Raven/Karol/Estelle/Guardian Field around. When    |
 | she's on her last leg, you find that she uses bigger, badder attacks.     |
 | That's really the only time you should worry about her.                   |
 |                                                                           |
 |¯¯¯¯¯¯¯¯¯¯¯¯¯¯¯¯¯¯¯¯¯¯¯¯¯¯¯¯¯¯¯¯¯¯¯¯¯¯¯¯¯¯¯¯¯¯¯¯¯¯¯¯¯¯¯¯¯¯¯¯¯¯¯¯¯¯¯¯¯¯¯¯¯¯¯|
 |  Drop: Rainbow Lens, Hunter's Monocle                                     |
 |  Secret Mission: Slash her when she uses her earthquake attack before she |
 |  gets up.                                                                 |
 +===========================================================================+
Exit, head up to the other save point, scene. Use Ba'ul from there.
=============
World Map
=============
I believe a scene will occur as you fly to the next place. ?
=============
Capua Nor
=============
Stay at the inn, scene. Back to the inn. Leave, scene..----------. .----------------------------( 36 )-------------------------------. | `----------´ | | |Playthrough Time: 10:25 Fly to the middle southern continent. Scene and fight a lot of enemies. Save point, Leave. ============| Northeastern Hypionia || | `-------------------------------------------------------------------------´
Dahngrest
============
To the Guild HQ. In the back middle room is a scene.

Also, a sidequest will trigger there. decline the job????
============
Nordopolica
============
You'll enter to a scene with Natz.


=========
 Aurnion
=========

Go back to Northeastern Hyponia to find a town now.

Save point by the Inn. Talk to Flynn.
Follow him out, talk to him again.

 +===========================================================================+
 |                              -- BOSS BATTLE --                            |
 +===========================================================================+
 | Enemy |   HP   |  TP  | P.ATK | P.DEF | M.ATK | M.DEF | AGL |  W  |   R   |
 |---------------------------------------------------------------------------|
 | Flynn | 126200 | 2200 |  615  |  620  |  400  |  425  | 220 |  -  | WD, L |
 |¯¯¯¯¯¯¯¯¯¯¯¯¯¯¯¯¯¯¯¯¯¯¯¯¯¯¯¯¯¯¯¯¯¯¯¯¯¯¯¯¯¯¯¯¯¯¯¯¯¯¯¯¯¯¯¯¯¯¯¯¯¯¯¯¯¯¯¯¯¯¯¯¯¯¯|
 | Recommended Level: 55-60                                                  |
 |                                                                           |
 | Strategy: His attacks don't hurt terribly much, but he can easily combo   |
 | you to oblivion. Free Run is your best friend here. If you use your own   |
 | MA on him, he will activate his instead. He'll use it on his own as well. |
 | He will always Holy Lance after First Aid.                                |
 |                                                                           |
 | He's only dangerous during overlimit, otherwise, don't be afraid to get   |
 | near him and let him have it! But be sure to snag him in the biggest      |
 | combo you have: I had 6x attack-> Skill Change-> Arcane-> Base-> Arcane   |
 |¯¯¯¯¯¯¯¯¯¯¯¯¯¯¯¯¯¯¯¯¯¯¯¯¯¯¯¯¯¯¯¯¯¯¯¯¯¯¯¯¯¯¯¯¯¯¯¯¯¯¯¯¯¯¯¯¯¯¯¯¯¯¯¯¯¯¯¯¯¯¯¯¯¯¯|
 |  Drop: Order of the Imperial Honor, Alexandrite, Paladin Cape             |
 |  Secret Mission: Get him to use all of his artes.                         |
 +===========================================================================+
Back to town, scene. Stay at the inn.
Tarqaron is above Aspio, enter it from Ba'ul.
Make sure you bring treats with you! Save them for the final boss.
.----------. .----------------------------( 37 )-------------------------------. | `----------´ | | |Playthrough Time: 10:44 Chest to the left has three Holy Bottles. Enter the door. Head up the northeast stairs. Then go south down the stairs.| The Ancient Tower, Tarqaron || | `-------------------------------------------------------------------------´
Exit south then go upstairs. Break the crystals with the ring. Head north.
Head west at the fountain. Continue to the next section.
Head upstairs and then to the northeast. Chest along the way has three Lemon Gels.
At the top, enter the left door. Go left and into the center circle.
Hit the ball to the left with the ring. Hit the other 3 into the middle hole.
Now exit to the right.
Save Point. At the top of the stairs, enter the left door.

 +===========================================================================+
 |                              -- BOSS BATTLE --                            |
 +===========================================================================+
 | Enemy |   HP   |  TP  | P.ATK | P.DEF | M.ATK | M.DEF |  AGL  |  W  |  R  |
 |---------------------------------------------------------------------------|
 | Zagi  | 425000 | 3000 |  730  |  800  |  666  |  450  |  798  |  -  |  -  |
 |¯¯¯¯¯¯¯¯¯¯¯¯¯¯¯¯¯¯¯¯¯¯¯¯¯¯¯¯¯¯¯¯¯¯¯¯¯¯¯¯¯¯¯¯¯¯¯¯¯¯¯¯¯¯¯¯¯¯¯¯¯¯¯¯¯¯¯¯¯¯¯¯¯¯¯|
 | Recommended Level: 59-64                                                  |
 |                                                                           |
 | Strategy: This guy is easy. No, really. His attacks shouldn't hurt very   |
 | much. I soloed him for a while with Yuri to get the secret mission, and   |
 | deaths were pretty rare. Just block his attacks and watch out for his MA  |
 | and you'll be just fine. Trust me. You've seen him four damn times before |
 | so one should think you know what's coming by now!                        |
 |                                                                           |
 |¯¯¯¯¯¯¯¯¯¯¯¯¯¯¯¯¯¯¯¯¯¯¯¯¯¯¯¯¯¯¯¯¯¯¯¯¯¯¯¯¯¯¯¯¯¯¯¯¯¯¯¯¯¯¯¯¯¯¯¯¯¯¯¯¯¯¯¯¯¯¯¯¯¯¯|
 |  Drop: Demon's Seal                                                       |
 |  Steal: Red Savory                                                        |
 |  Secret Mission: Smack him down after he uses Blastia Bane.               |
 +===========================================================================+
Exit to the left. Head down the stairs then back up the right stairs.
Enter the right door at the top.

Go west and hit the blue switch with the ring. Continue forward.
Hit the switch to the right. Now go back and to the right.
Hit the switch, then the next one. Backtrack to the initial fork.
Chest has three Pineapple Gels and Lemon Gels.
Hit the switch to the east.

Eventually you'll come to a chest (Panacea bottles) and a switch.
Hit it and then go back and right. Hit the switch, continue on.
Hit the end switch. Backtrack to the fork and go left.
Continue going left until you find the new path.
Hit the switch. Chest has three Miracle Gels.
Return all the way back to the right.
A new path opened up, leading to a switch. Hit it.
Go back left to find a new path heading north.
Forward for a scene. Save point. SAVE.
Go beat his ass!
+===========================================================================+ | -- BOSS BATTLE -- | +===========================================================================+ | Enemy | HP | TP | P.ATK | P.DEF | M.ATK | M.DEF | AGL | W | R | |---------------------------------------------------------------------------| | Duke | 286500 | 4000 | 762 | 750 | 690 | 704 | 712 | - | - | |¯¯¯¯¯¯¯¯¯¯¯¯¯¯¯¯¯¯¯¯¯¯¯¯¯¯¯¯¯¯¯¯¯¯¯¯¯¯¯¯¯¯¯¯¯¯¯¯¯¯¯¯¯¯¯¯¯¯¯¯¯¯¯¯¯¯¯¯¯¯¯¯¯¯¯| | Recommended Level: 60-70 (depends on skill level) | | | | Strategy: He can warp. That's really the only thing that's special about | | form one. He's extremely easy to combo to oblivion. If you use Yuri, the | | Super Chains and Glory are your best friends. Basically, just chase him | | around the battlefield and let him have it. Don't worry about a thing. | |===========================================================================| | Enemy | HP | TP | P.ATK | P.DEF | M.ATK | M.DEF | AGL | W | R | |---------------------------------------------------------------------------| | Duke 2 | 467500 | 6000 | 808 | 880 | 760 | 754 | 744 | - | - | |¯¯¯¯¯¯¯¯¯¯¯¯¯¯¯¯¯¯¯¯¯¯¯¯¯¯¯¯¯¯¯¯¯¯¯¯¯¯¯¯¯¯¯¯¯¯¯¯¯¯¯¯¯¯¯¯¯¯¯¯¯¯¯¯¯¯¯¯¯¯¯¯¯¯¯| | Ah, here we go. Round two, fight! This time, however, you have to watch | | his HP at the end. You MUST finish this guy with a Mystic Arte. Other | | than that, you'd better give this guy your all - especially those of you | | who didn't collect all the Fell Arms. If you did, you may want to hold on | | to many of your items and such for a bit longer. | | | | This guy is a heavy hitter. That much is certain. He's also harder to | | stagger. MUCH harder. Krona's Symbol is lovely. And anything along those | | lines. You want lots of items otherwise. But honestly, whack this guy | | with everything you have; it's harder than last time, but it's very much | | possible. I even took off my beloved Glory skill to see for myself. When | | he nails you with Big Bang, use a Treat IMMEDIATELY. | |¯¯¯¯¯¯¯¯¯¯¯¯¯¯¯¯¯¯¯¯¯¯¯¯¯¯¯¯¯¯¯¯¯¯¯¯¯¯¯¯¯¯¯¯¯¯¯¯¯¯¯¯¯¯¯¯¯¯¯¯¯¯¯¯¯¯¯¯¯¯¯¯¯¯¯| | Secret Mission: Kill him with a Mystic Arte. | | Drop: Last Fencer | +===========================================================================+ | Enemy | HP | TP | P.ATK | P.DEF | M.ATK | M.DEF | AGL | W | R | |---------------------------------------------------------------------------| | Duke 3 | 528200 | 10000 | 1100 | 1150 | 1256 | 1078 | 1126 | - | - | |¯¯¯¯¯¯¯¯¯¯¯¯¯¯¯¯¯¯¯¯¯¯¯¯¯¯¯¯¯¯¯¯¯¯¯¯¯¯¯¯¯¯¯¯¯¯¯¯¯¯¯¯¯¯¯¯¯¯¯¯¯¯¯¯¯¯¯¯¯¯¯¯¯¯¯| | You should be 75 or higher for this. Well, the non-cheap way. | | | | If you feel like you fail at life, use an All-Divide. This guy is brutal. | | He's entirely optional. Also, if you don't have Glory or something like | | it, have fun. I'm not crazy enough to do that on my first playthrough at | | level 69 and lower! On higher difficulties, this guy is plain cheap, but | | on normal, he's basically a stronger - much stronger! - version of the | | same thing. And make sure you can cure every status ailment under the | | sun! Way too cheap. Be very happy that Big Bang doesn't kill. | | | | However, he may use an MA that will once his health is low: Brave | | Vesperia. I've personally never seen the MA on normal difficulty, but | | I've been informed that it happens sometimes. So the way to avoid being | | killed by it is by spamming Gale Dog or Force Field with the Eternal | | Support skill on. | | | | The Cheap Way: Rita. O.L. Boost + Light Magic + Spell End. Meteor Storm. | | Go into overlimit, spam Meteor Storm, trigger OL again, spam Meteor Storm | | and keep doing it. You can win at about any level XD | +===========================================================================+ Playthrough Time: 11:25.----------. .----------------------------( 38 )-------------------------------. | `----------´ | | |You can continue from where you left off. You'll be back at Tarqaron.| Ex Dungeon || | `-------------------------------------------------------------------------´
Go to Phaeroh's Crag, then to the sage at Yormgen. To Dahngrest! Once you see
the scene, fly to the west (to Yurzorea) for a scene on Ba'ul. You'll now see
a little black warp thingy below you. Be sure that you're prepared!

To get through to the end, you need 15 fake gald. You may have to pass through
multiple times. You get them randomly from bosses and from chests. To open
chests, fight enemies. This also makes the warps appear. Once you make it to
Yeager or Schwann, or Alexei or Duke later on, you can leave. The warps are a
more gold color. I find that fighting more bosses gets you more Fake Gald,
though you still have to be lucky. I can't tell you anything that will increase
your chances of getting fake gald. Sorry.

This place is good for grinding to boot. And the gald you get is tremendous!
Put Sephira on everyone (and as many Blue Sephira as you can) and watch the
money climb to 10 mil for the achievement. Personally, I got 5 mil on a few
runs. On 10x exp, this area makes grinding to 200 a breeze
So, once you get 15 gald... Here comes Kratos! Though he doesn't go "Hee hee
hee", normally. His official name is Traitor to Heaven, but the box is going to
call him Kratos.

 +===========================================================================+
 |                              -- BOSS BATTLE --                            |
 +===========================================================================+
 | Enemy  |   HP   |  TP  | P.ATK | P.DEF | M.ATK | M.DEF | AGL  |  W  |  R  |
 |---------------------------------------------------------------------------|
 | Kratos | 512000 | 3800 |  869  |  950  |  820  |  775  | 520  |  -  |  -  |
 |¯¯¯¯¯¯¯¯¯¯¯¯¯¯¯¯¯¯¯¯¯¯¯¯¯¯¯¯¯¯¯¯¯¯¯¯¯¯¯¯¯¯¯¯¯¯¯¯¯¯¯¯¯¯¯¯¯¯¯¯¯¯¯¯¯¯¯¯¯¯¯¯¯¯¯|
 | Recommended Level: 75+ (Whatever level you end up as is probably fine.)   |
 |                                                                           |
 | Strategy: Wow, he has all his obnoxious combos still. Yes, you'll find    |
 | them obnoxious too. I swear this guy doesn't stagger for long either. He  |
 | likes to simply jump outta them. However, he's fairly easy. Shining Bind  |
 | is the only real thing to look out for, as it can kill you if you aren't  |
 | high enough in level (I was nearing 100).                                 |
 |                                                                           |
 | He has the ability to stun you. If that happens, expect him to completely |
 | pwn you, even if you have Glory (and you should by now!).                 |
 |                                                                           |
 | His ability to heal himself is annoying, but keep trying to smack him and |
 | he'll die eventually.                                                     |
 |¯¯¯¯¯¯¯¯¯¯¯¯¯¯¯¯¯¯¯¯¯¯¯¯¯¯¯¯¯¯¯¯¯¯¯¯¯¯¯¯¯¯¯¯¯¯¯¯¯¯¯¯¯¯¯¯¯¯¯¯¯¯¯¯¯¯¯¯¯¯¯¯¯¯¯|
 |  Experience: 30000                                                        |
 |  Gald: 15000                                                              |
 +===========================================================================+
You'll get the Letter of Challenge (Legend) for winning. And an Achievement.